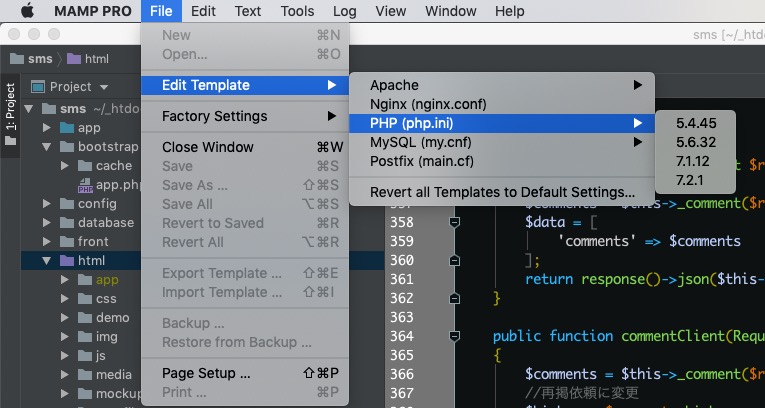
MAMP PROでPHP(php.ini)の設定を変更する方法はメニューのFile > Edit Template > PHP > バージョンを選ぶ
次のように選択すればおけ、メモ。
次のように選択すればおけ、メモ。
//基本
$ wget {URL}
//深さ-r 再帰的 , l1は深さ
$ wget -r -l1 {URL}
//標準出力へ
$ wget -O - {URL}
//ダウンロード間隔
$ wget -r -l1 -w3 {URL}
//拡張子指定
$ wget -r -l1 -A jpg,png,gif,svg {URL}
//拡張子除外
$ wget -r -l1 -R jpg,png,gif,svg {URL}
//親ディレクトリを外す(not parent)
$ wget -r -np http://example.com/camera
IE11の背景にSVG画像を設定すると位置がおかしかったり、サイズがおかしい場合の対応方法。
(background-size , background-positionが効かない)
以下の属性をsvg画像に追加する。
<svg xmlns="http://www.w3.org/2000/svg" viewBox="0 0 504.53 3.78"><defs><style>.cls-1{fill:none;stroke:#eb6400;stroke-linecap:round;stroke-linejoin:round;stroke-width:3.78px;stroke-dasharray:1.26 10.07;}</style></defs><title>product-ttl-boder_1</title><g id="レイヤー_2" data-name="レイヤー 2"><g id="text"><line class="cls-1" x1="1.89" y1="1.89" x2="502.64" y2="1.89"/></g></g></svg>
<svg preserveAspectRatio="xMinYMid" width="504.53" height="3.78" xmlns="http://www.w3.org/2000/svg" viewBox="0 0 504.53 3.78"><defs><style>.cls-1{fill:none;stroke:#eb6400;stroke-linecap:round;stroke-linejoin:round;stroke-width:3.78px;stroke-dasharray:1.26 10.07;}</style></defs><title>product-ttl-boder_1</title><g id="レイヤー_2" data-name="レイヤー 2"><g id="text"><line class="cls-1" x1="1.89" y1="1.89" x2="502.64" y2="1.89"/></g></g></svg>
もっと効率化を測れないかを、いつもクライアント事業フローを見るように自分自身を見たことないなと改めて効率化を考えてみることにしました。
大まかな今のフロー
Web制作で非エンジニアのマークアップエンジニア、Webデザイナー/ディレクターさんなどが簡単に使えるWebサーバーを作ってみました。
サイトのルートのフォルダを選ぶだけの簡単なものです。
画像のパスなどがあれ、<img src="/img/xxx.jpg">
などになっている場合及び、スマホ実機でのテストなどでつかえます。
■yapache
https://github.com/yamaaaaaa/yapache
■yapache
https://github.com/yamaaaaaa/yapache
簡単にいうと、親テーマの機能を継承するしくみ。
有料テーマの更新などでの先祖返りを防いだり、グループ企業でカラーリング/雰囲気を変えたいときなど便利
メモ。sass-convertコマンドで可
$ sass-convert 元ファイル名.css 新しいファイル名.sass
$ sass-convert 元ファイル名.css 新しいファイル名.scss
$ sudo gem install sass -n /usr/local/bin/
(エラーメッセージ)
too many arguments to conversion to http.HandlerFunc: http.HandlerFunc("/", handler)
http.HandleFunc を手癖で http.HandlerFunc (rを入れてしまう。).
とうち間違ってしまっていた。
キーボードホームポジションでカーソルキー上下左右を操作したい。
以下のようにカスタム設定したJSONを配置。(今回はkarabiner.json)
内容を記載して、ComplexModificationsでAdd ruleを選ぶとルールが追加されているはずなので、追加。
以下はその karabiner.jsonの内容
{
"global": {
"check_for_updates_on_startup": true,
"show_in_menu_bar": true,
"show_profile_name_in_menu_bar": false
},
"profiles": [
{
"complex_modifications": {
"parameters": {
"basic.simultaneous_threshold_milliseconds": 10,
"basic.to_delayed_action_delay_milliseconds": 100,
"basic.to_if_alone_timeout_milliseconds": 1000,
"basic.to_if_held_down_threshold_milliseconds": 500
},
"rules": [
{
"description": "コマンドキーを単体で押したときに、英数・かなキーを送信する。(左コマンドキーは英数、右コマンドキーはかな) (rev 3)",
"manipulators": [
{
"from": {
"key_code": "left_command",
"modifiers": {
"optional": [
"any"
]
}
},
"parameters": {
"basic.to_if_held_down_threshold_milliseconds": 100
},
"to": [
{
"key_code": "left_command",
"lazy": true
}
],
"to_if_alone": [
{
"key_code": "japanese_eisuu"
}
],
"to_if_held_down": [
{
"key_code": "left_command"
}
],
"type": "basic"
},
{
"from": {
"key_code": "right_command",
"modifiers": {
"optional": [
"any"
]
}
},
"parameters": {
"basic.to_if_held_down_threshold_milliseconds": 100
},
"to": [
{
"key_code": "right_command",
"lazy": true
}
],
"to_if_alone": [
{
"key_code": "japanese_kana"
}
],
"to_if_held_down": [
{
"key_code": "right_command"
}
],
"type": "basic"
}
]
},
{
"description": "ctrl + k -> up_arrow",
"manipulators": [
{
"from": {
"key_code": "k",
"modifiers": {
"mandatory": [
"control"
],
"optional": [
"any"
]
}
},
"to": [
{
"key_code": "up_arrow"
}
],
"type": "basic"
},
{
"from": {
"key_code": "j",
"modifiers": {
"mandatory": [
"control"
],
"optional": [
"any"
]
}
},
"to": [
{
"key_code": "down_arrow"
}
],
"type": "basic"
},
{
"from": {
"key_code": "f",
"modifiers": {
"mandatory": [
"control"
],
"optional": [
"any"
]
}
},
"to": [
{
"key_code": "right_arrow"
}
],
"type": "basic"
},
{
"from": {
"key_code": "b",
"modifiers": {
"mandatory": [
"control"
],
"optional": [
"any"
]
}
},
"to": [
{
"key_code": "left_arrow"
}
],
"type": "basic"
}
]
}
]
},
"devices": [],
"fn_function_keys": [
{
"from": {
"key_code": "f1"
},
"to": {
"consumer_key_code": "display_brightness_decrement"
}
},
{
"from": {
"key_code": "f2"
},
"to": {
"consumer_key_code": "display_brightness_increment"
}
},
{
"from": {
"key_code": "f3"
},
"to": {
"key_code": "mission_control"
}
},
{
"from": {
"key_code": "f4"
},
"to": {
"key_code": "launchpad"
}
},
{
"from": {
"key_code": "f5"
},
"to": {
"key_code": "illumination_decrement"
}
},
{
"from": {
"key_code": "f6"
},
"to": {
"key_code": "illumination_increment"
}
},
{
"from": {
"key_code": "f7"
},
"to": {
"consumer_key_code": "rewind"
}
},
{
"from": {
"key_code": "f8"
},
"to": {
"consumer_key_code": "play_or_pause"
}
},
{
"from": {
"key_code": "f9"
},
"to": {
"consumer_key_code": "fastforward"
}
},
{
"from": {
"key_code": "f10"
},
"to": {
"consumer_key_code": "mute"
}
},
{
"from": {
"key_code": "f11"
},
"to": {
"consumer_key_code": "volume_decrement"
}
},
{
"from": {
"key_code": "f12"
},
"to": {
"consumer_key_code": "volume_increment"
}
}
],
"name": "Default profile",
"selected": true,
"simple_modifications": [],
"virtual_hid_keyboard": {
"country_code": 0
}
}
]
}
LetsEncryptの更新がうまく行かなかった(certbot-auto renew –force-renew)
きちんと自動更新してなかったのもあり、証明書の期限を切らしてしまった。ちゃっと終わらそうと以下を叩くとエラー時のめも。
# certbot-auto renew --force-renew
- - - - - - - - - - - - - - - - - - - - - - - - - - - - - - - - - - - - - - - -
Processing /etc/letsencrypt/renewal/yama-lab.com.conf
- - - - - - - - - - - - - - - - - - - - - - - - - - - - - - - - - - - - - - - -
Plugins selected: Authenticator webroot, Installer None
Renewing an existing certificate
Performing the following challenges:
http-01 challenge for yama-lab.com
Waiting for verification...
Challenge failed for domain yama-lab.com
http-01 challenge for yama-lab.com
Cleaning up challenges
Attempting to renew cert (yama-lab.com) from /etc/letsencrypt/renewal/yama-lab.com.conf produced an unexpected error: Some challenges have failed.. Skipping.
The following certs could not be renewed:
/etc/letsencrypt/live/yama-lab.com/fullchain.pem (failure)
とエラーが出るの以下を実行
# certbot-auto certonly -d yama-lab.com
Saving debug log to /var/log/letsencrypt/letsencrypt.log
How would you like to authenticate with the ACME CA?
- - - - - - - - - - - - - - - - - - - - - - - - - - - - - - - - - - - - - - - -
1: Apache Web Server plugin (apache)
2: Nginx Web Server plugin (nginx)
3: Spin up a temporary webserver (standalone)
4: Place files in webroot directory (webroot)
- - - - - - - - - - - - - - - - - - - - - - - - - - - - - - - - - - - - - - - -
Select the appropriate number [1-4] then [enter] (press 'c' to cancel): 2 // 2を入力Enter
Plugins selected: Authenticator nginx, Installer None
Cert is due for renewal, auto-renewing...
Renewing an existing certificate
Performing the following challenges:
http-01 challenge for yama-lab.com
Waiting for verification...
Cleaning up challenges
IMPORTANT NOTES:
- Congratulations! Your certificate and chain have been saved at:
/etc/letsencrypt/live/yama-lab.com/fullchain.pem
Your key file has been saved at:
/etc/letsencrypt/live/yama-lab.com/privkey.pem
Your cert will expire on 2019-06-10. To obtain a new or tweaked
version of this certificate in the future, simply run certbot-auto
again. To non-interactively renew *all* of your certificates, run
"certbot-auto renew"
- If you like Certbot, please consider supporting our work by:
Donating to ISRG / Let's Encrypt: https://letsencrypt.org/donate
Donating to EFF: https://eff.org/donate-le
で解決
Powered by WordPress & Theme by Anders Norén